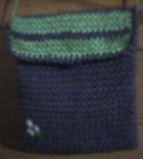
Woven Shoulder Bag
This bag is easy to make. It is however, annoying to make. The woven pattern is slower knitting than most any pattern in existence. But it's worth it. It will give you a very taut attractive material and you will not need to line the bag (don't you hate to line things?) to keep even the smallest things snuggly inside. The whole bag is knit in one piece, except for the shoulder strap.
I used a medium ply mercerized cotton yarn left over from a project I completed years ago. One ball of yarn is certainly sufficient, although I used the generous scraps of two colors. I used average sized needles (use one size larger than whatever fits to your left over yarn). About the pattern--what you are doing is constantly crossing stitches over each other.
Make up 45 stitches. Knit the first row.
Now start the pattern (odd numbers are the front of work):
Row 1: Slip 1, *slip one, knit the next stitch from behind the slipped stitch,
now knit the first one* slip one.
Row 2: Slip 1, pearl 1, *slip one, pearl the next one to the front of the
slipped stitch, now pearl the first one*, pearl 1, slip one.
Keep doing this throughout the work.
Keep knitting for the desired full length you'd like for the bag (16cm / 6 1/4"). Change colors for the back if you so desire, knit stripes, whatever you like, and keep knitting until you have twice that length. Switch colors for the flap to contrast with with first color you used (or keep knitting in stripes the way I did) and knit another (6cm / 2 1/2") for the flap.
This finished bag has a width of 13cm / 5 inches.
Bind off. Fold the finished material with the wrong side facing you and sew the side seams of the bag, leaving the flap free. Turn the bag right side out. Crochet around the opening and the flap for a neat finish. To close the bag, sew on snaps or Velcro (that's what I used). Crochet a cord or chain for the length of the shoulder strap. Slip each end through the sides of the bag, make a sturdy knot on the part of the cord inside the bag and it's done!
(Cool idea: My daughter decided to slip some interesting beads on the cord before retying the knot inside the bag. You can also sew on a little appliqué in one corner.)
Home | Knit Knacks | Email